HPC Connection
| Authors | christine Tranchant-Dubreuil (christine.tranchant@ird.fr) |
|---|---|
| Creation Date | 26/02/2018 |
| Last Modified Date | 11/03/2018 |
Summary
- Preambule: Softwares to install before connecting to a distant linux server
- Practice 1: Transferring files with filezilla
sftp - Practice 2: Get Connecting on a linux server by
ssh - Practice 3: First steps : prompt &
pwdcommand - Practice 4: List the files using
lscommand - Practice 5 : List the files using
MARKDOWN_HASH44ba5ca65651b4f36f1927576dd35436MARKDOWNHASHcommand and metacaracter *_ - practice-6 : Moving into file system using
cdandlscommands - practice-7 : Manipulating Files and Folders
- practice-8 : Dealing with text files
- practice-9 : Searching with
grep - practice-10 : Blast analysis
- Tips
- Links
- License
Preambule
Getting connected to a Linux servers from Windows with SSH (Secure Shell) protocol
| Platform | Software | Description | url |
|---|---|---|---|
 |
mobaXterm | an enhanced terminal for Windows with an X11 server and a tabbed SSH client | more |
|
putty | Putty allows to connect to a Linux server from a Windows workstation. | Download |
Transferring and copying files from your computer to a Linux servers with SFTP (SSH File Transfer Protocol) protocol
| Platform | Software | Description | url |
|---|---|---|---|
  |
 filezilla filezilla |
FTP and SFTP client | Download |
Viewing and editing files on your computer before transferring on the linux server or directly on the distant server
| Type | Software | url |
|---|---|---|
| Distant, consol mode | nano | Tutorial |
| Distant, consol mode | vi | Tutorial |
| Distant, graphic mode | komodo edit | Download |
| Linux & windows based editor | Notepad++ | Download |
Practice 1 : Transferring files with filezilla sftp
Download and install FileZilla
Open FileZilla and save the IRD cluster into the site manager
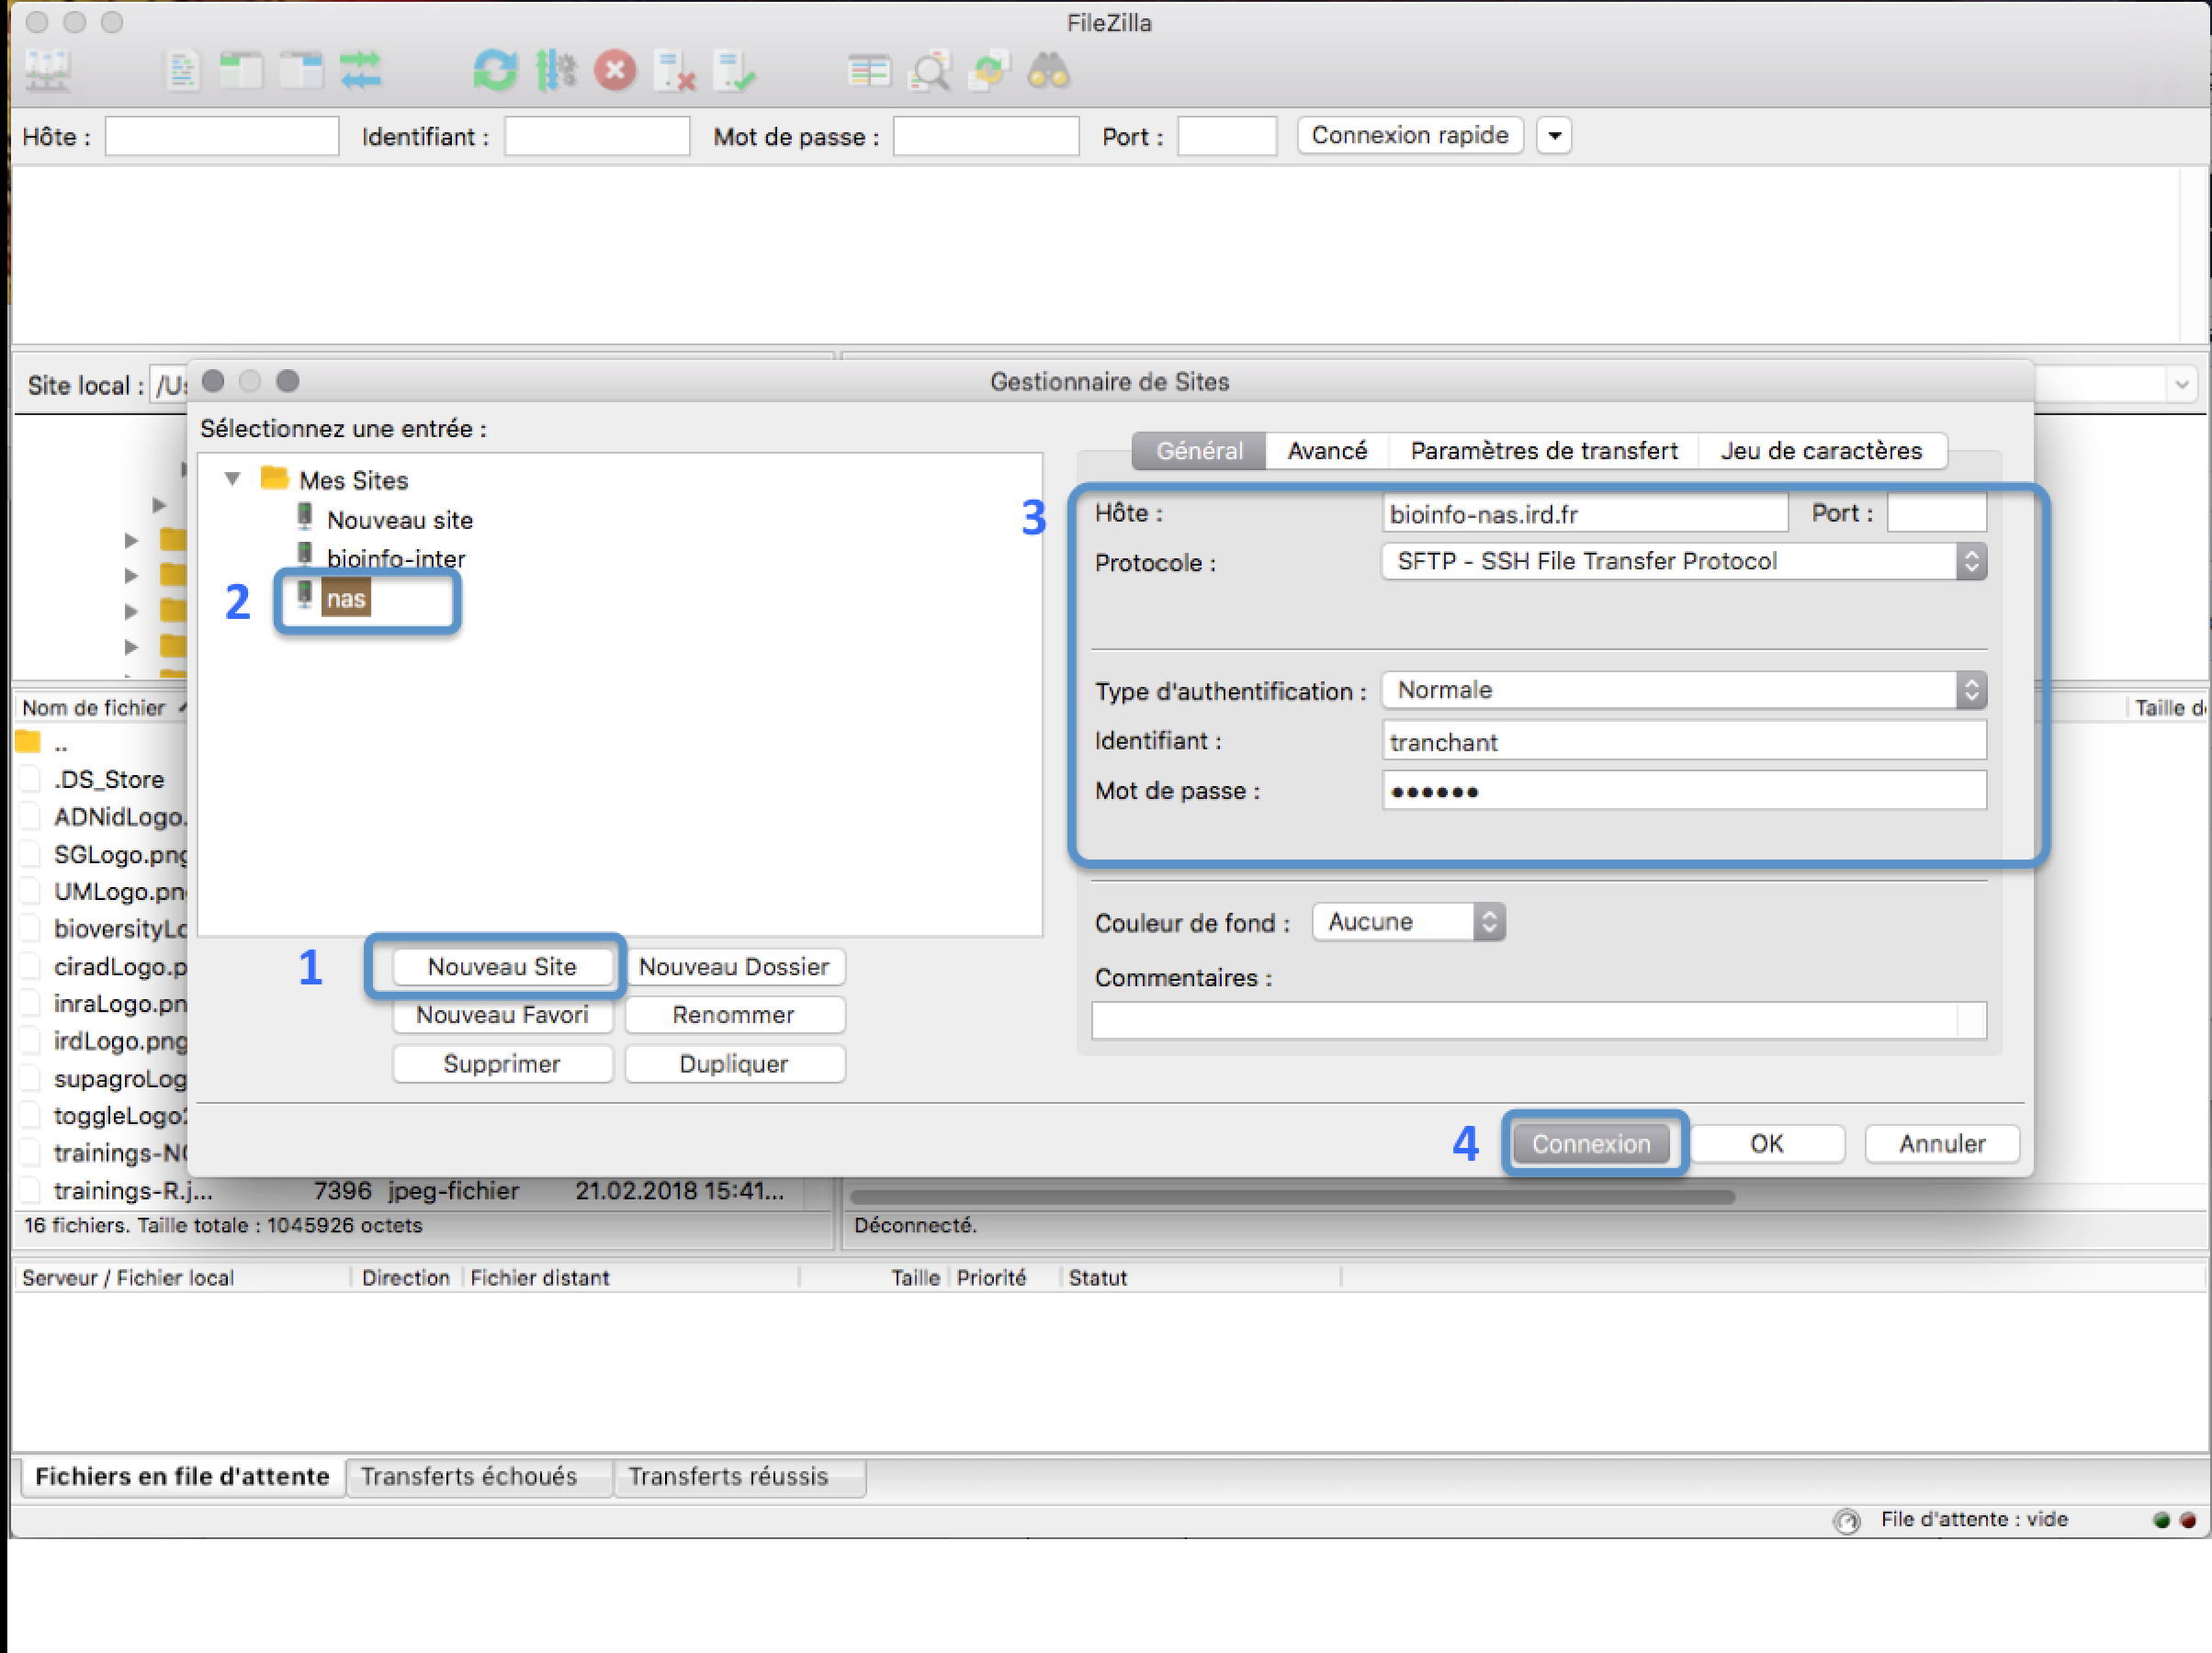
In the FileZilla menu, go to File > Site Manager. Then go through these 5 steps:
- Click New Site.
- Add a custom name for this site.
- Add the hostname bioinfo-nas.ird.fr
- Set the Logon Type to "Normal" and insert your username and password used to connect on the IRD cluster
- Press the "Connect" button.
Transferring files
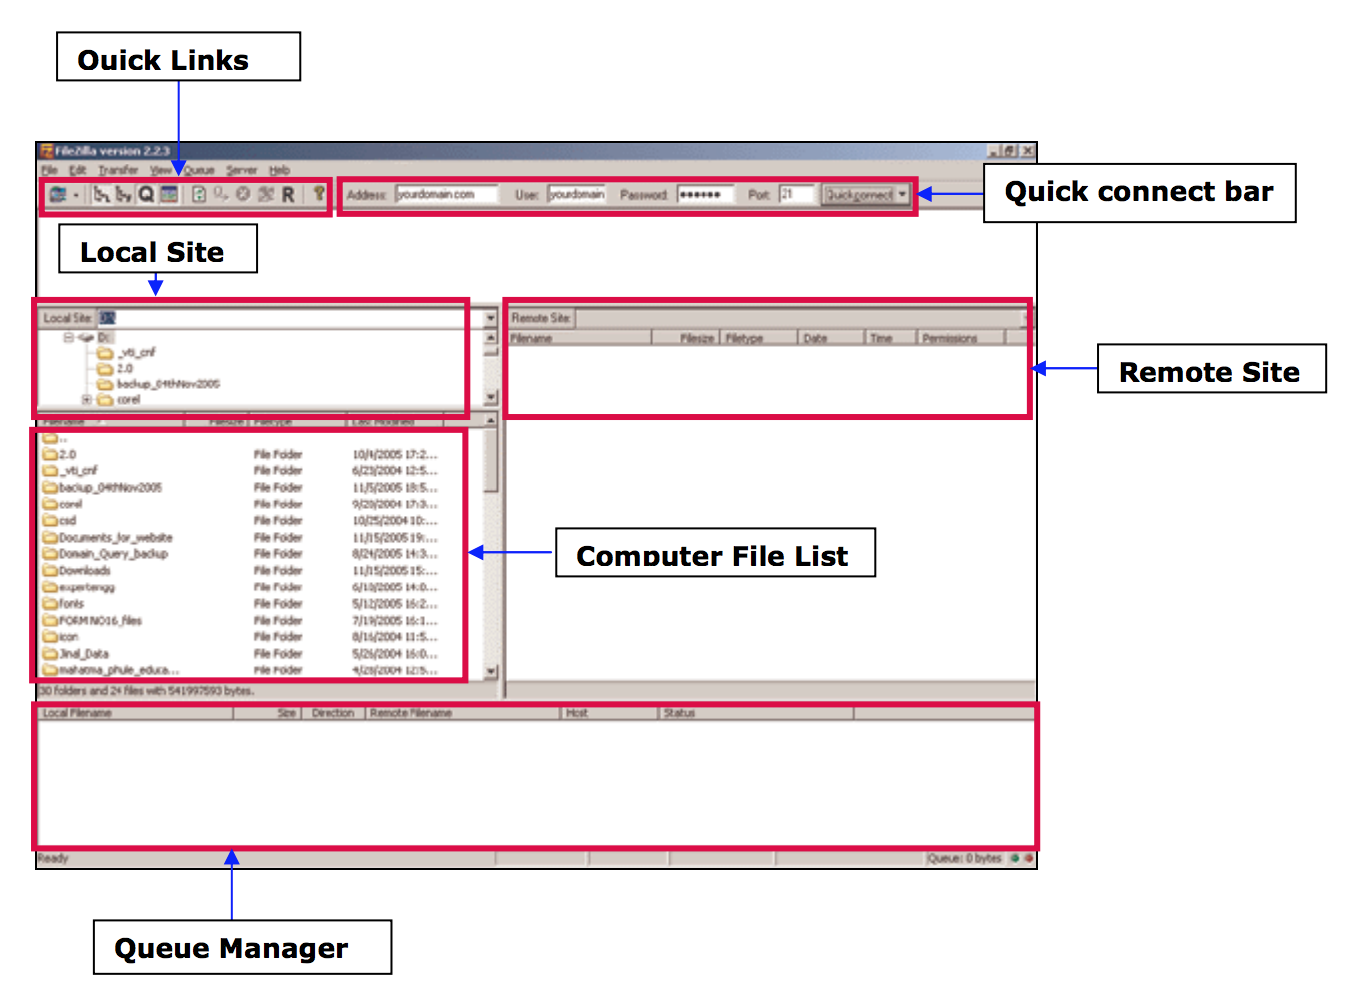
- From your computer to the cluster : click and drag an text file item from the left local colum to the right remote column
- From the cluster to your computer : click and drag an text file item from he right remote column to the left local column
Practice 2 : Get Connecting on a linux server by ssh
In mobaXterm:
- Click the session button, then click SSH.
- In the remote host text box, type: bioinfo-inter.ird.fr
- Check the specify username box and enter your user name
- In the console, enter the password when prompted.
Once you are successfully logged in, you will be use this console for the rest of the lecture.
Practice 3 : First steps : prompt & pwd
-
What is the current/working directory just by looking the prompt?
-
Check the name of your working directory with
pwdcommand? -
On the console, type your 2 first linux commands to get data necessary for the next (we will explain the two commands latter):
# copy data into your home directory
cp /scratch/LINUX-TP/LINUX-TP.tar.gz .
decompress the gzip file
tar -xzvf LINUX-TP.tar.gz -
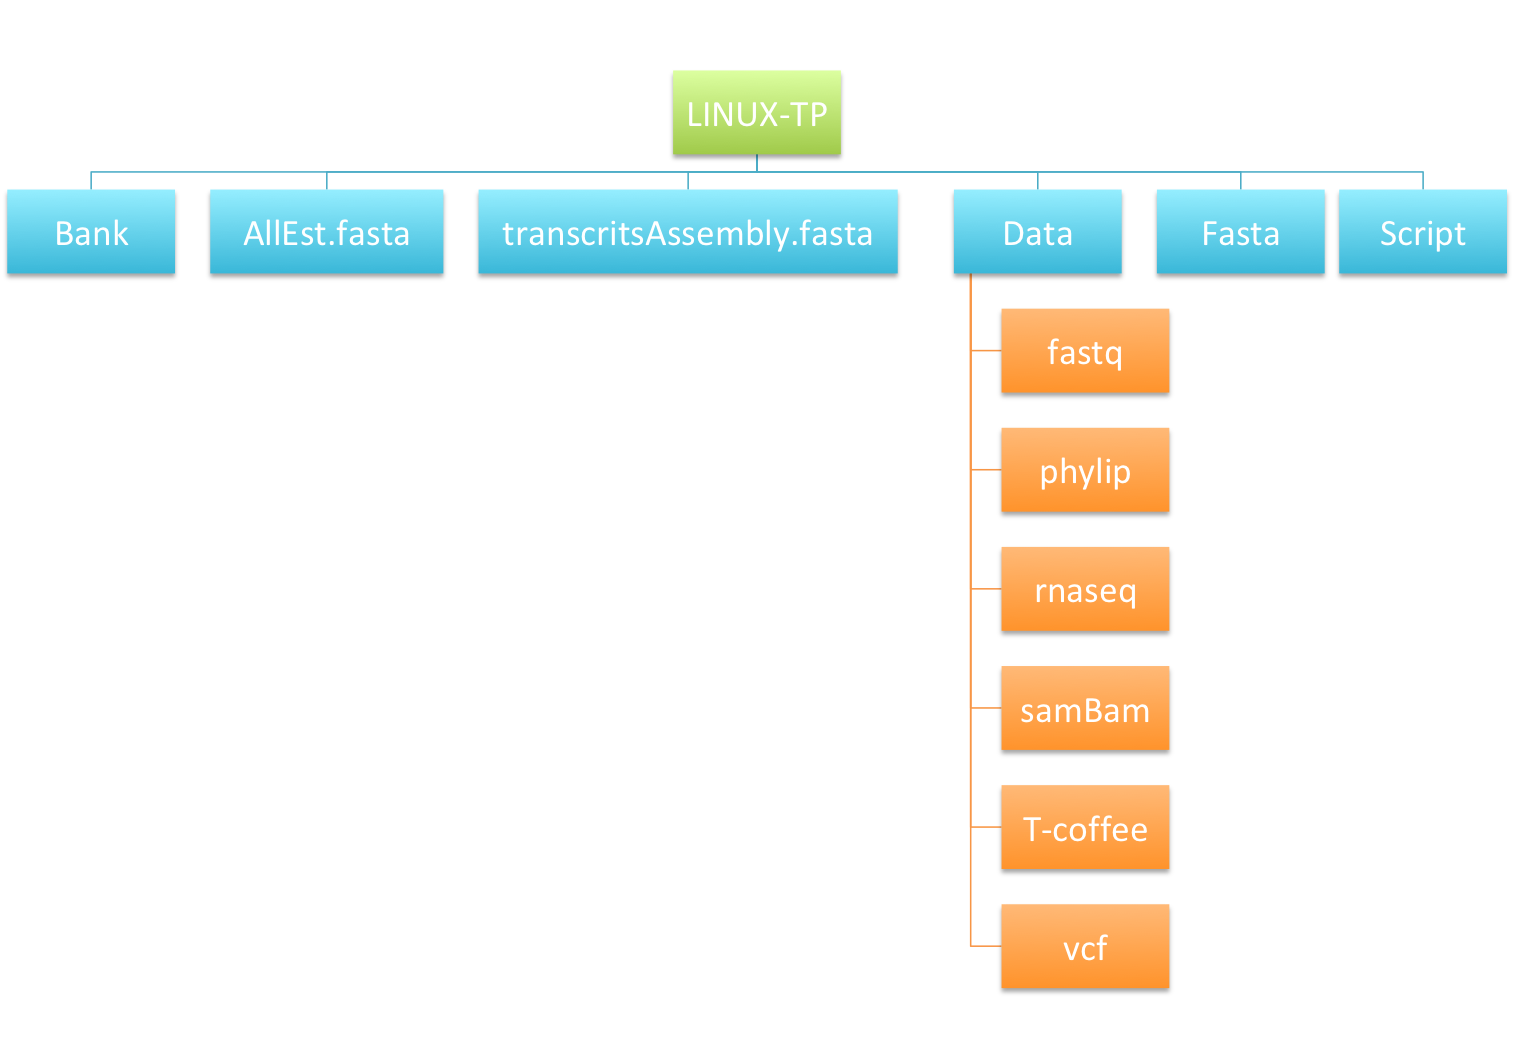
Check through filezilla the content of your home directory on the server now (cf. filetree just below)
-
Delete through filezilla the file LINUX-TP.tar.gz on the server
Practice 4 : List the files using ls command
- List the content of your home directory
- List the content of the directory
Fastaby using its absolute path in first then its relative path -lscommand - List the content of the directory
Datawith thelscommand and the option-R - List the content of the directory
Bankwith thelscommand and the option-alor-a -l
Practice 5 : List the files using MARKDOWN_HASH44ba5ca65651b4f36f1927576dd35436MARKDOWNHASH command and metacaracter *_
- List the content of the directory
T-coffee. Are there only fasta files ? -lscommand - List only the files starting by sample (in the directory
T-coffee) -MARKDOWN_HASH44ba5ca65651b4f36f1927576dd35436MARKDOWNHASHcommand & *_ - List only the files with the fasta extension (in the directory
T-coffee) -MARKDOWN_HASH44ba5ca65651b4f36f1927576dd35436MARKDOWNHASHcommand & *_
Practice 6 : Moving into file system using cdand ls command
- Go to the directory
Scriptand check in the prompt you have changed correctly your working directory (pwd). - List the dir content with
ls. - Go to the
Fastadirectory using../ - Go to the
Fastqdirectory . From this directory, and without any change in your working dir, list what's insamBamdirectory - List
vcfdirectory using -R option. What is there in this dir ? - Come back to the home directory.
Practice 7 : Manipulating Files and Folders
We will prepare our blast analysis performed after by creating directory and moving files as showing in the image just below :
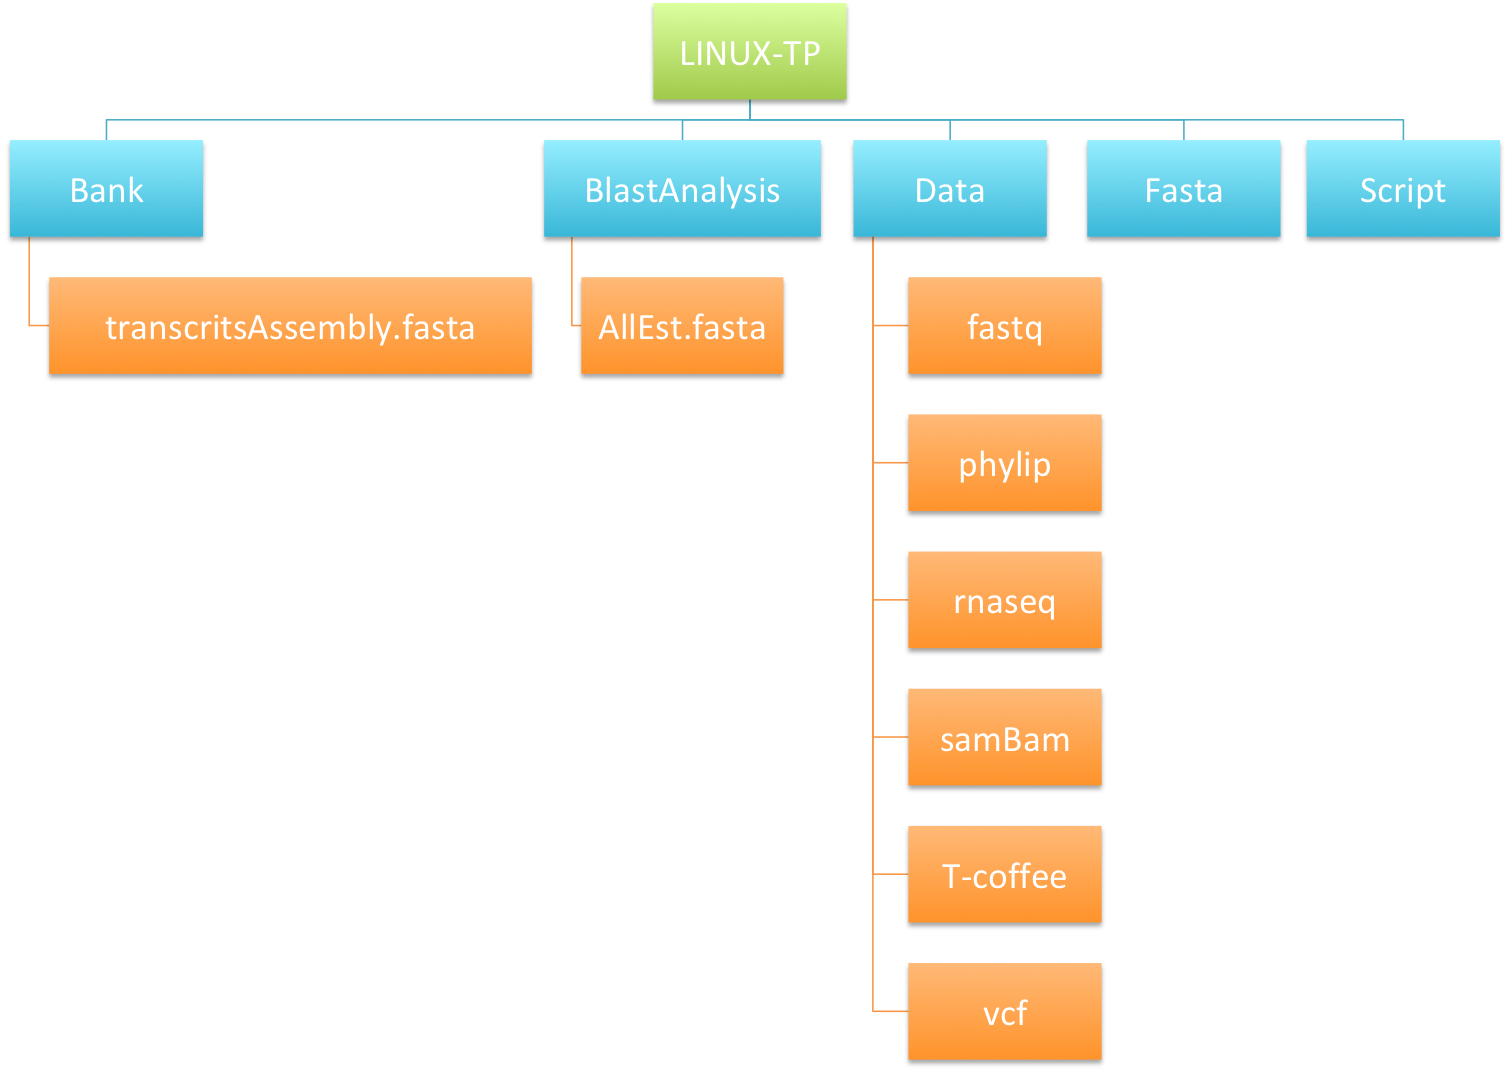
- Create a directory called
BlastAnalysiswithmkdircommand. - Move
transcritsAssembly.fastainto this new directory withmvcommand. - List the content of
LINUX-TPandBlastAnalysiswithlscommand. - Copy
AllEst.fastainBankdirectory withcpcommand. - List the content of
LINUX-TPandBankdirectories. What are the differences between mv and cp? - Remove the file
AllEst.fastainLINUX-TPdirectory withrmcommand. - Copy the whole directory
T-coffeewith the nameT -coffee-copyintoLINUX-TPdirectory. - After checking the content of
LINUX-TPdirectory, remove the directoryT-coffee-copy. How to remove a directory ? - Remove all the files into the directory
T-coffee-copywithrm *command. - Remove the directory
T-coffee-copy.
Practice 8 : Dealing with text Files
- Create in your home directory the directory
myVCFand go into it. - Create a shortcut of the file
/scratch/LINUX-TP/VCF/OgOb-all-MSU7-CHR6.GATKSELECTVARIANTS.vcfwith the commandln -s source_file myfile
ln -s /scratch/LINUX-TP/VCF/OgOb-all-MSU7-CHR6.GATKSELECTVARIANTS.vcf link1.vcf- Repeat the same operation with the second vcf file and name the link
link2.vcf - List the content of the directory
myVCFwithls -l - Displays the first lines of the two vcf files -
headcommand - Displays the last lines of the two vcf files -
tailcommand - Count the lines of the vcf files -
wc -lcommand
Practice 9 : Searching with grep
- Go on the following page : http://rice.plantbiology.msu.edu/pub/data/Eukaryotic_Projects/o_sativa/annotation_dbs/pseudomolecules/version_7.0/
- Copy the url of the rice genome annotation file (gff format) that we will use to download the file directly on the server
- Go to the
bankdirectory and type the following command :
{% highlight bash %}wget gff_url{% endhighlight %}
- After checking the content of your current directory, what have you done with the
$wgetcommand? - Displays the firts and lasts line of the gff file
- Prints the number of lines with the word genes in the gff file
- Counts the number of genes
- Searchs for the nbs-lrr genes
- Removes the lines with putative word
Practice 10 : Blast analysis
Creating a custom database with makeblastdb
As we use a custom database for the first time, If we have a fasta format file of these sequences we have to create a database from our fasta format file AllEst.fasta with the makeblastdb command.
-
Go into the
bankdirectory and create a nucleotide database by typing:makeblastdb -in AllEst.fasta -dbtype nucl -parse_seqids -
List the content of the directory to check if the database has been indexed
BLASTing against our remote database
- Go into the
blastAnalysisdirectory - Run the blast by typing the following command with the outfmt equals to 6 :
blastn –query fastaFile -db databaseFile –outfmt [0-11] -out resultFile- Output formats
The flag for the output format is -outfmt followed by a number which denotes the format request :

0 = pairwise,
1 = query-anchored showing identities,
2 = query-anchored no identities,
3 = flat query-anchored, show identities,
4 = flat query-anchored, no identities,
5 = XML Blast output,
6 = tabular,
7 = tabular with comment lines,
8 = Text ASN.1,
9 = Binary ASN.1,
10 = Comma-separated values,
11 = BLAST archive format (ASN.1)
</pre>- Output tabular format (6 or 7): one line per results splitted in 12 fields.
1. query id
2. subject id
3. percent identity
4. alignment length
5. number of mismatche-
6. number of gap openings
7. query start
8. query end
9. subject start
10. subject end
11. expect value
12. bit score
Parsing the results file
- Display the first 10 lines of the file -
head - Display the first 15 lines of the file -
head - Display it last 15 lines -
tail - Count the number of line -
wc - Sort the lines using the second field (subject id) by alphabetical order, ascending then descending -
csort - Sort lines by e‐value (ascending) and by “alignment length” (descending) -
csort - Extract the first 4 fields -
cut - Extract query id, subject id, evalue, alignment length
cut
Tips
How to convert between Unix and Windows text files?
The format of Windows and Unix text files differs slightly. In Windows, lines end with both the line feed and carriage return ASCII characters, but Unix uses only a line feed. As a consequence, some Windows applications will not show the line breaks in Unix-format files. Likewise, Unix programs may display the carriage returns in Windows text files with Ctrl-m (^M) characters at the end of each line.
There are many ways to solve this problem as using text file compatible, unix2dos / dos2unix command or vi to do the conversion. To use the two last ones, the files to convert must be on a Linux computer.
use notepad as file editor on windows
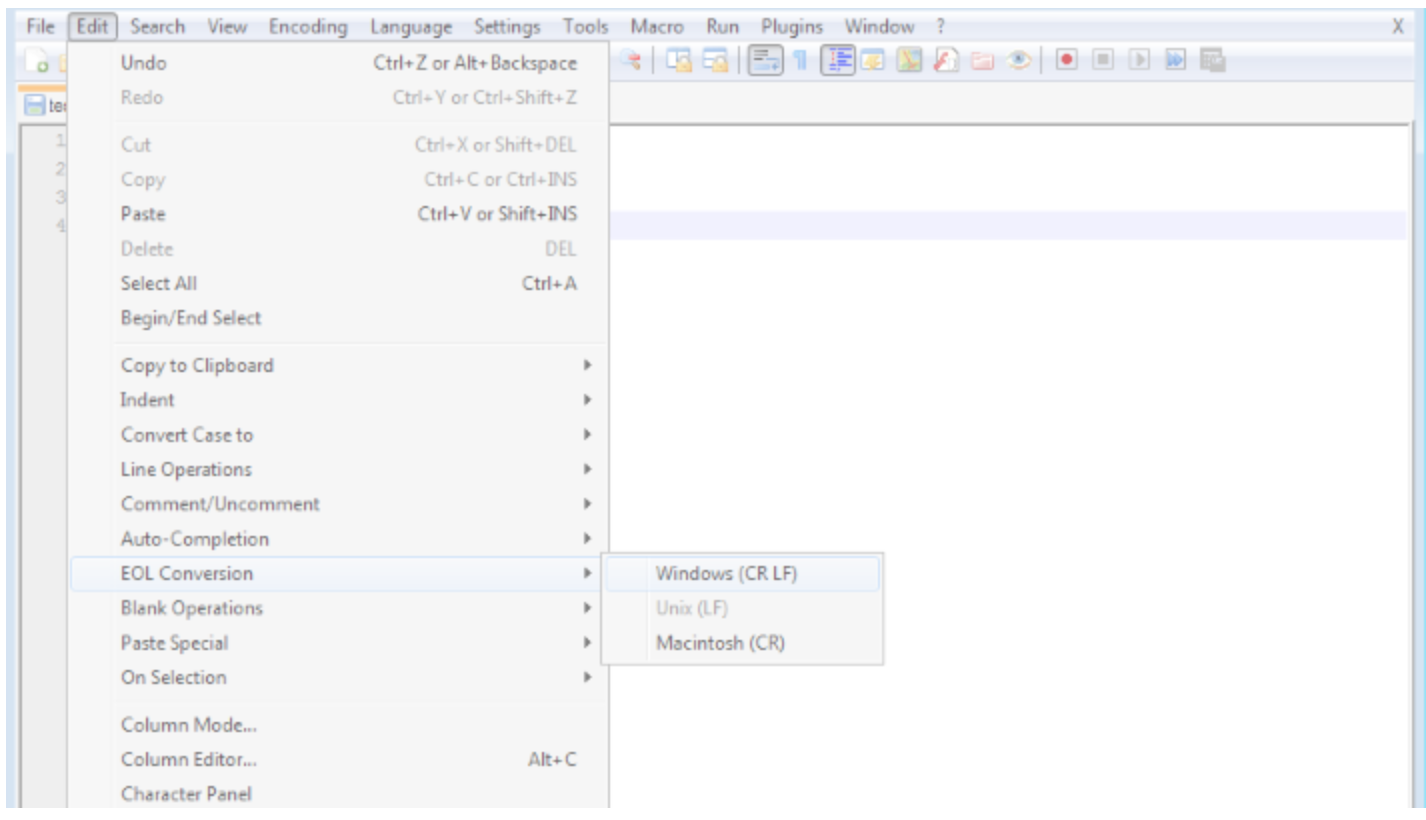
When using Unix files on Windows, it is useful to convert the line endings to display text files correclty in other Windows-based or linux-based editors.
In Notepad++: Edit > EOL Conversion > Windows Format
unix2dos & dos2unix
# Checking if my fileformat is dos
[tranchant@master0 ~]$ cat -v test.txt
jeidjzdjzd^M
djzoidjzedjzed^M
ndzndioezdnezd^M

# Converting from dos to linux format
[tranchant@master0 ~]$ dos2unix test.txt
dos2unix: converting file test.txt to Unix format ...
[tranchant@master0 ~]$ cat -v test.txt
jeidjzdjzd
djzoidjzedjzed
ndzndioezdnezd

# Converting from linux to dos format
[tranchant@master0 ~]$ unix2dos test.txt
unix2dos: converting file test.txt to DOS format ...
[tranchant@master0 ~]$ cat -v test.txt
jeidjzdjzd^M
djzoidjzedjzed^M
ndzndioezdnezd^M
[tranchant@master0 ~]$
vi
- In vi, you can remove carriage return ^M characters with the following command:
:1,$s/^M//g - To input the ^M character, press Ctrl-v, and then press Enter or return.
- In vim, use :
set ff=unixto convert to Unix; use:set ff=dosto convert to Windows.
How to open and read a file through a text editor on a distant linux server?
vi
nano
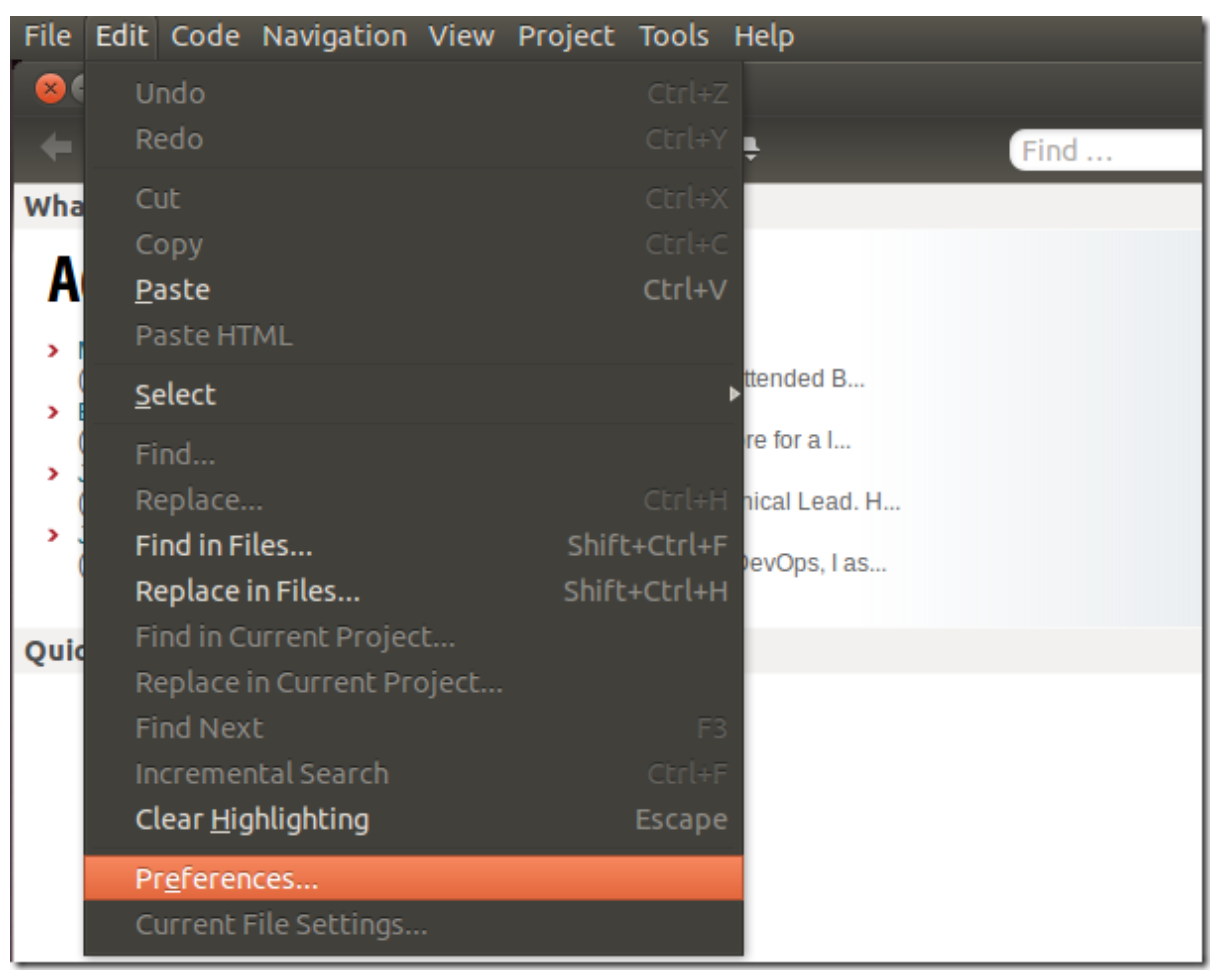
Komodo Edit
After installing Komodo Edit, open it and click on Edit –> Preferences
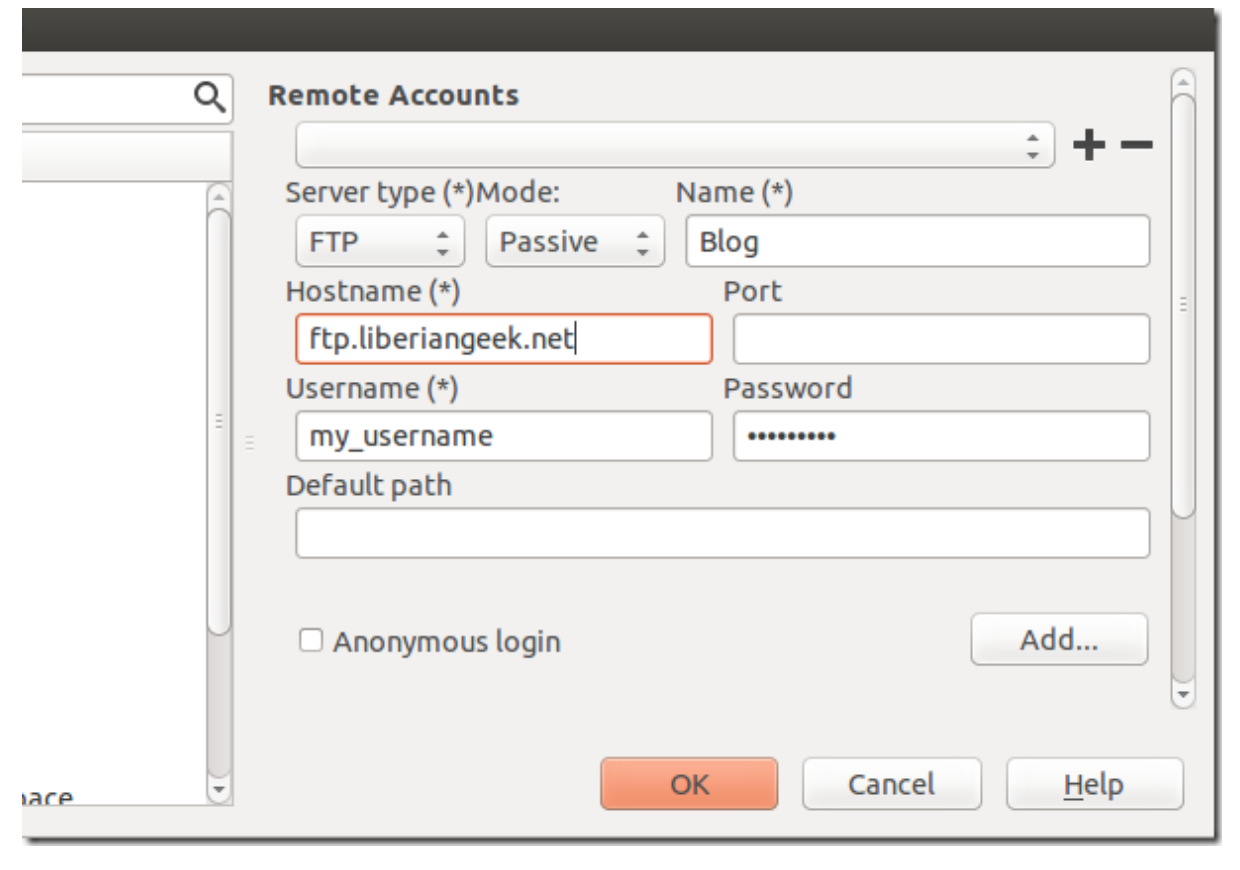
Select Servers from the left and enter sftp account information, then save it.
To edit a distant content, click on File –> Open –> Remote File

Getting Help on any command-line
with the option --help
Virtually all commands understand the -h (or --help) option, which produces a short usage description of the command and its options.
[tranchant@master0 ~]$ ls --help
Utilisation : ls [OPTION]... [FILE]...
Afficher des renseignements sur les FILEs (du répertoire actuel par défaut).
Trier les entrées alphabétiquement si aucune des options -cftuvSUX ou --sort
ne sont utilisées.

Les arguments obligatoires pour les options longues le sont aussi pour les
options courtes.
  -a, --all                  ne pas ignorer les entrées débutant par .
  -A, --almost-all           ne pas inclure . ou .. dans la liste
      --author               avec -l, afficher l'auteur de chaque fichier
  -b, --escape               afficher les caractères non graphiques avec des
                               protections selon le style C
      --block-size=SIZE      convertir les tailles en SIZE avant de les
                               afficher. Par exemple, « --block-size=M » affiche
                               les tailles en unités de 1 048 576 octets ;
                               consultez le format SIZE ci-dessous
  -B, --ignore-backups       ne pas inclure les entrées se terminant par ~ dans
                               la liste
  -c                         avec -lt : afficher et trier selon ctime (date de
                               dernière modification provenant des informations
                               d'état du fichier) ;
                               avec -l : afficher ctime et trier selon le nom ;
                               autrement : trier selon ctime
  -C                         afficher les noms en colonnes
      --color[=WHEN]         colorier la sortie ; par défaut, WHEN peut être
                               « never » (jamais), « auto » (automatique) ou
                               « always » (toujours, valeur par défaut) ; des
                               renseignements complémentaires sont ci-dessous
  -d, --directory            afficher les noms de répertoires, pas leur contenu
...
with the man command
Every command and nearly every application in Linux has a man (manual) file, so finding such a file is as simple as typing man command to bring up a longer manual entry for the specified command.
# Type man ls to display the related manual

LS(1)                                      Manuel de l'utilisateur Linux                                      LS(1)

NOM
       ls, dir, vdir - Afficher le contenu d'un répertoire

SYNOPSIS
       ls [options] [fichier...]
       dir [fichier...]
       vdir [fichier...]

       Options POSIX : [-CFRacdilqrtu1] [--]

       Options  GNU  (forme  courte)  :  [-1abcdfgiklmnopqrstuvwxABCDFGHLNQRSUX]  [-w  cols]  [-T  cols] [-I motif]
       [--full-time]  [--show-control-chars]   [--block-size=taille]   [--format={long,verbose,commas,across,verti‐
       cal,single-column}]       [--sort={none,time,size,extension}]       [--time={atime,access,use,ctime,status}]
       [--color[={none,auto,always}]] [--help] [--version] [--]

DESCRIPTION
       La commande ls affiche tout d'abord l'ensemble de ses arguments fichiers autres que des répertoires. Puis ls
       affiche  l'ensemble  des  fichiers  contenus  dans chaque répertoire indiqué. Si aucun argument autre qu'une
       option n'est fourni, l'argument « . » (répertoire en cours) est pris  par  défaut.  Avec  l'option  -d,  les
       répertoires  fournis  en argument ne sont pas considérés comme des répertoires (on affiche leurs noms et pas
       leurs contenus). Un fichier n'est affiché que si son nom ne commence pas par un point, ou si l'option -a est
       fournie.

       Chacune  des  listes  de fichiers (fichiers autres que des répertoires, et contenu de chaque répertoire) est
       triée séparément en fonction de la séquence d'ordre de la localisation en cours.  Lorsque  l'option  -l  est
       .....
Some helpful tips for using the man command :
Arrow keys: Move up and down the man file by using the arrow keys.q: Quit back to the command prompt by typing q.
Links
- Related courses : Linux for Dummies
- Tutorials : Linux Command-Line Cheat Sheet
License