Howtos cluster i-Trop
| Description | HowTos for i-Trop Cluster |
|---|---|
| Author | Ndomassi TANDO (ndomassi.tando@ird.fr) |
| Creation date | 08/11/19 |
| Modification date | 13/03/2026 |
Summary
- Preambule: Architecture of the Itrop Cluster and Softwares to install before connecting to the cluster
- How to: Add ssh keys to connect to the cluster
- How to:Transfer files with filezilla
sftpon the i-Trop cluster - How to: Connect to the i-Trop cluster via
ssh - How to: Reserve one or several cores of a node
- How to: Transfer my data from the san server to the node
- How to: Use the Module Environment
- How to: Launch a job with Slurm
- How to: Choose a particular partition
- How to: See or delete your data on the /scratch partition of the nodes
- How to: Use a singularity container
- How to: Cite the Itrop platform in your publications
- Links
- License
Preambule
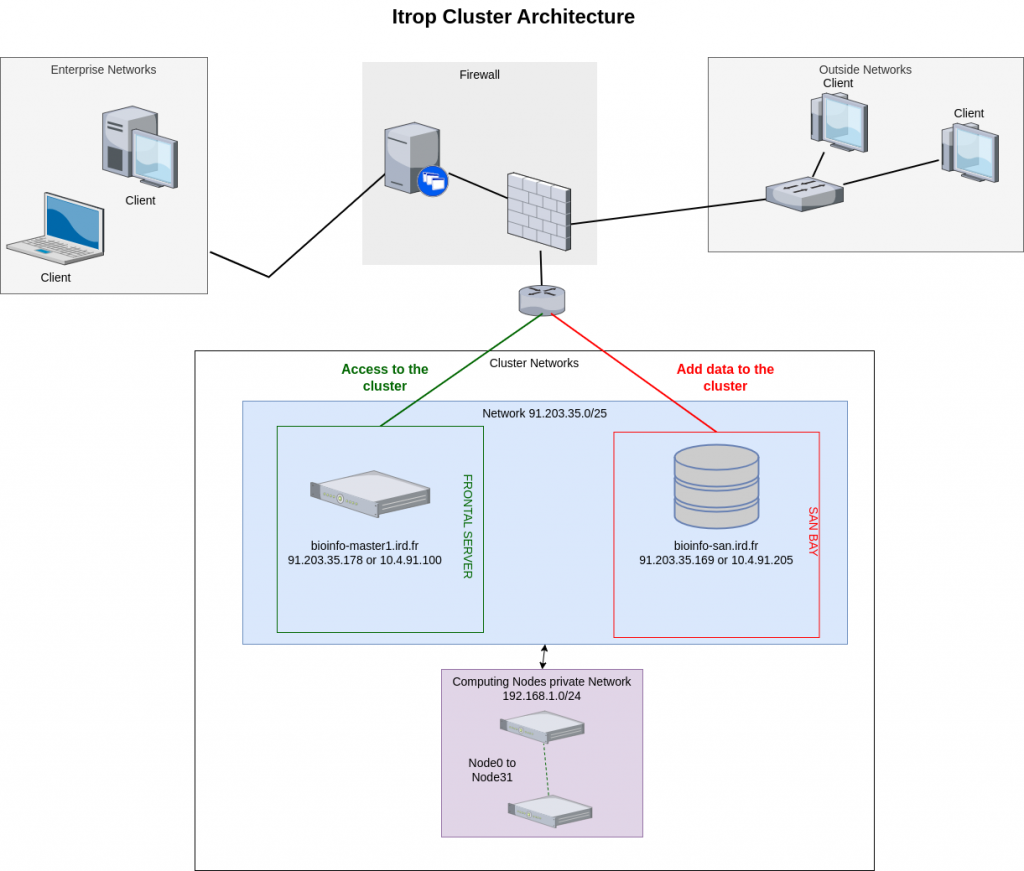
Architecture of the i-Trop cluster :
The i-Trop computing cluster is made up of a set of computing servers accessible via a front-end machine. Connections to these compute servers are made via this master machine, which ensures the distribution of the different analyses between the machines available at any given moment.
The computing cluster is composed of :
- 1 master machine
- 1 san bay for temporary storage of project data up to 800TB
- 32 CPU computing nodes with a total capacity of 1404 cores and 8392GB of RAM and a GPU server with 8 RTX 2080 graphics cards..
Here is the architecture:
Connecting to a server in ssh from a Windows machine
| System | Softwares | Description | url |
|---|---|---|---|
 |
mobaXterm | an advanced terminal for Windows with an X11 server and an SSH client | Download |
|
putty | Putty allows to connect to a Linux server from a Windows machine . | Télécharger |
Transfer files from your computer to Linux servers with SFTP
| Systems | Softwares | Description | url |
|---|---|---|---|
  |
 filezilla filezilla |
FTP and SFTP client | Download |
View and edit files locally or on a remote server
| Type | url | |
|---|---|---|
| Distant, console mode | nano | Tutorial |
| Distant, console mode | vi | Tutorial |
| Distant, graphic mode | komodo edit | Télécharger |
| Linux & windows éditeur | Notepad++ | Télécharger |
How to : Add ssh keys to connect to the cluster
Follow the instructions here: https://bioinfo.ird.fr/index.php/en/tutorials-howtos-add-ssh-keys/
How to : Transfer files with filezilla sftp
Open FileZilla and save the i-Trop cluster into the site manager
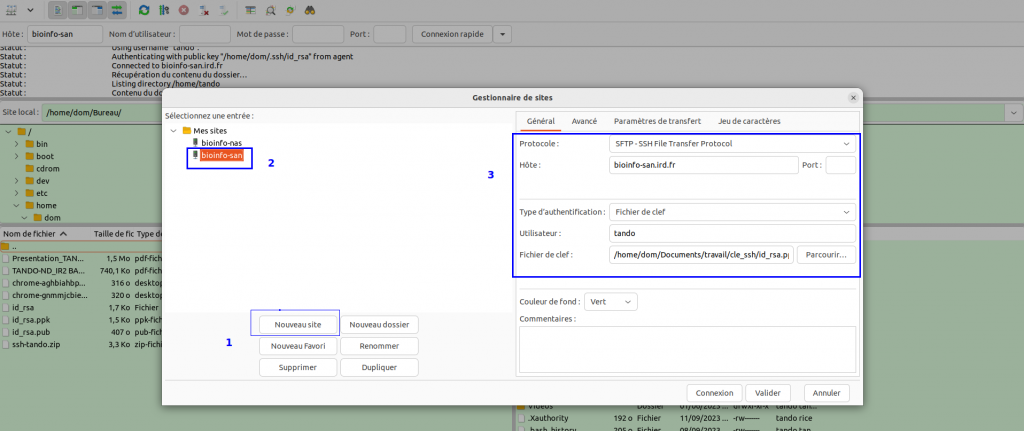
In the FileZilla menu, go to File > Site Manager. Then go through these 5 steps:
- Click on New Site.
- Add an explicit name.
-
Choose host bioinfo-san.ird.fr
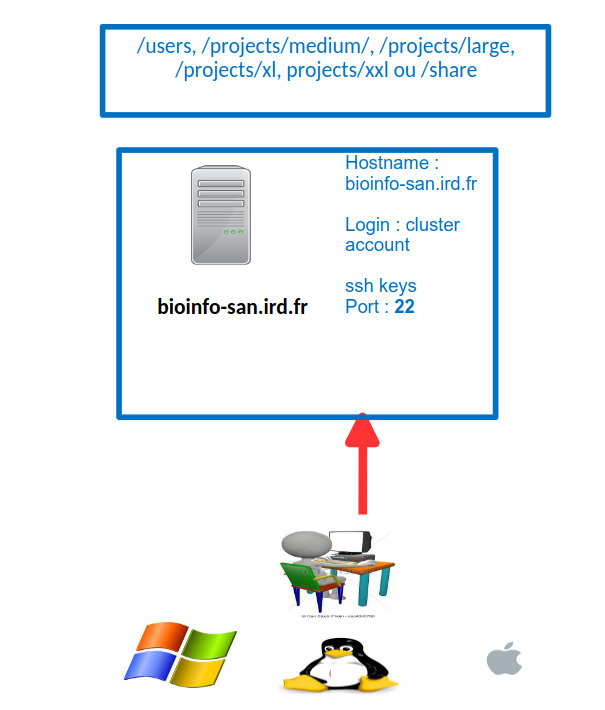
- Put the Logon Type to "key File" and choose the id_rsa.ppk key retreived before
- Choose port 22 and press the "Connect" button.
Transferring files
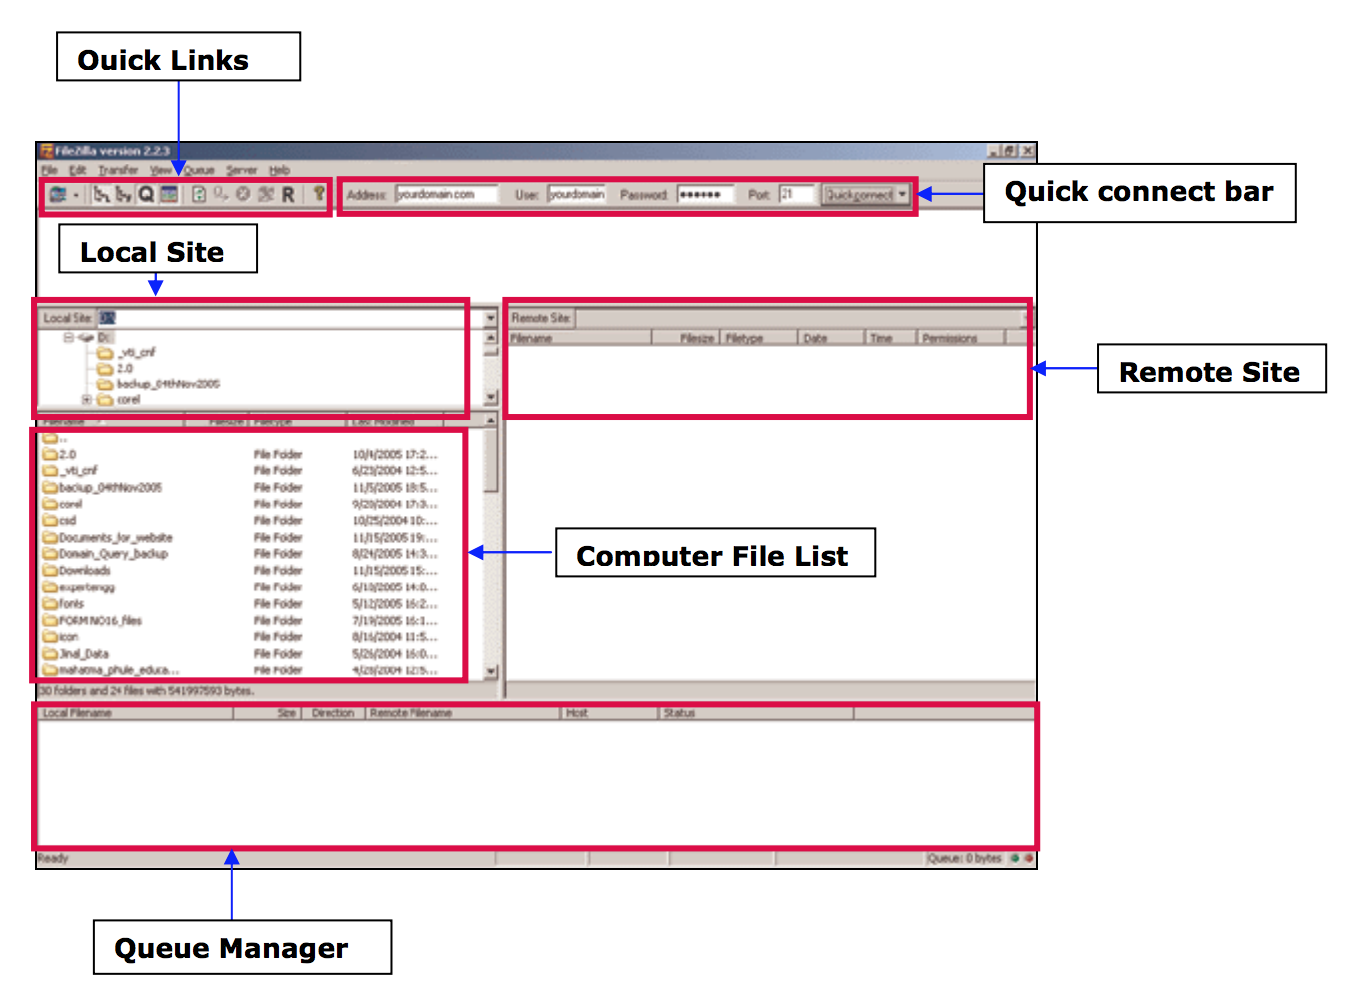
- From your computer to the cluster : click and drag an text file item from the left local column to the right remote column
- From the cluster to your computer: click and drag an text file item from he right remote column to the left local column
How to : How to: Connect to the i-Trop cluster via ssh
From a windows computer :
with mobaXterm:
- Click the session button and choose SSH.
- In the remote host box, type: bioinfo-master1.ird.fr
- Check the specify username box and enter your login
- Choose Advanced SSH settings
- Tick the « Use private key » box and provides your id_rsa.ppk from your ssh-login.zip then press OKs
From a MAC or Linux:
Open terminal application and type the following command:
ssh login@bioinfo-master1.ird.fr
with login: your cluster account
How to : Reserve one or several cores of a node
Cluster uses Slurm (https://slurm.schedmd.com/documentation.html) to deal with users analyses
It monitors available resources (CPU et RAM ) and allocate them to the users for job launching
When you are connected on bioinfo-master1.ird.fr, you have the possibily to reserve one or serveral cores among them of the 28 nodes available
Reserving one core
Type the following command:
srun -p short --pty bash -i
You will be randomly connected to one of the nodes of the short partition with one core reserved.
Reserving several cores at the same time
Typê the following command:
srun -p short -c X --pty bash -i
With X the number of cores between 2 and 12.
You will be randomly connected to one of the nodes of the short partition with X reserved cores
Reserving one core of a specific node:
type the following command
srun -p short --nodelist=nodeX --pty bash -i
With nodeX belonging to the short partition
Reserving one or several cores of a node using --constraint option:
Features/Constraints allow users to make very specific requests to the scheduler. On our cluster, with have different features depending on what you need.
Features
Description
Nodes
512
allows to select 512 GB RAM memory nodes in highmem partition
node5, node28,node29,node30
avx
allows to select nodes with avx processors
node0, node1, node4, node5, node7, node17, node18, node20, node21, node22, node23, node24, node25, node26, node27, node28, node29, node31
BEAST
allows to select nodes to use BEAST with beagle
node4, node7, node28, node29, node30
dell
allows to select dell nodes
node28,node29,node30
geforce
allows to choose gpu nodes with geforce graphical card
node26
infiniband
allows to select infiniband nodes to speed up your data transfer
node0, node1, node4, node5, node7, node8, node11, node17, node20, node21, node22, node24, node25, node26, node27
rtx2080
allows to select nodes with rtx2080 gpu cards
node26
xeon
allows to select nodes with intel xeon processors
node0, node1, node5,node8, node10, node11, node12, node13, node14, node15, node16, node17, node18, node20, node21, node22, node23, node24, node25, node27
xeon-gold
allows to select nodes with intel xeon-gold processors
node4, node7, node26, node28, node29, node30, node31
To use one o several features, you have to use the --constraint option
For example, to choose a node with avx processors , you will type:
srun constraint=avx --pty bash -i
For example, to choose a node with infiniband and 512 GB of ram on highmem partition, you will type:
srun -p highmem --constraint=512,infiniband --pty bash -i
How to : Transfer my data from the san bay to nodes
On the cluster, every node has its own local partition called /scratch.
/scratch is used to receive data to analyse, perform analyses on them and produces data results temporarly.
Data on /scratch is hosted for 30 days max expect for the nodes from the long partition until 45 day
It is mandatory to transfer its data to the /scratch of the reserved node before launching its analyses.
The /scratch volumes range from 1TB to 14TB depending on the chosen node.
When the analyses are finished, consider recovering your data.
scp command:
To transfer data between 2 remote servers, we use the command scp
scp -r source destination
There are 2 possible syntaxes:
Retrieve data from the san:
scp -r san:path_to_files/file local_destination
Transfer data to the san:
scp -r /local_path_to_files/file san:remote_destination
Description of the partitions:
User data
Each user has a 100GB personal volume to host data.
This personal folders are hosted into the /users partition of the bioinfo-san.ird.fr
For example for user test is personal folder will be /users/test
Be careful:On bioinfo-master1.ird.fr and the nodes, the /users and the /home partitions contain the same data . This is not the case for bioinfo-san.ird.fr : /home is different from /users
Projects partitions
- /projects/medium: hosts small or temporary projects up to 1000 GB
- /projects/large: hosts normal projects from 1 to 4,9TB
- /projects/xl: hosts big projects from 5 to 9,9TB
share partitions
the /share partition is used to hosts data such as banks or to make available temporary data
Use the infiniband nodes to transfer:
The infiniband network (192.168.4.0) allows users to have access to an high speed network to transfer their data from the san to the nodes or between infiniband nodes.
Only certain nodes are equiped with infiniband for now : node0, node1, node4, node5, node7, node8, node9, node11, node17, node20, node21, node22, node23, node24, node25, node26, node27
To use the infiniband network, we have to add the "-ib" siffix to the alias of the machine, for example san will become san-ib, node0 will become node0-ib etc...
Use the options -p partition ( with partition being the node partition) --constraint=infiniband to reserve one or several cores on a infiniband node:
For example, we want to reserve an infiniband node on highmem partition in a interactive mode, type the following command:
srun -p highmem --constraint=infiniband --pty bash -i
you now have access to the infiniband network, to use it just change the alias san to san-ib to do your transfers
There are 2 possible syntaxes:
Retrieve data from the san:
scp -r san-ib:path_to_files/file local_destination
Transfer data to the san:
scp -r /local_path_to_files/file san-ib:remote_destination
How to : Use module Environnement
Module Environment allows you to dynamically change your environment variable(PATH, LD_LIBRARY_PATH) and then choose your version software.
The nomenclature use for modules is package_name/package_version
Softwares are divided in 2 environnements:
- bioinfo-itrop: Load the list of the bioinformatics software installed by i-Trop
- bioinfo-shared: Load the list of the bioinformatics softwares provided by the IFB Core cluster
Choose the environment to work on
module load bioinfo-itrop or module load bioinfo-shared
You can work with only one environment loaded : bioinfo-itrop or bioinfo-shared, if you want to use softwares from the other make sure to unload the loaded environment first with:
module unload bioinfo-itrop or module unload bioinfo-shared
Displaying the available software
module avail
Displaying the description of a sotfware
module whatis module_name/version
with module_name: the name of themodule.
For example : samtools version 1.7:
module whatis samtools/1.7
load a software:
module load module_name/version
with module_name: module name.
For example : samtools version 1.7:
module load samtools/1.7
unload a software
module unload module_name/version
with module_name: module name.
For example : samtools version 1.7:
module unload samtools/1.7
Displaying the loaded modules
module list
Unloading all the modules
module purge
How to : Launch a job with Slurm
Cluster uses Slurm to manage and prioritize users jobs .
It checks the ressources availables (CPU and RAM ) and allocate them to the users to perform their analyses.
Connected to bioinfo-master1.ird.fr, we can launch a command with srun or a script withsbatch.
Use srun with a command:
If you simply want to launch a command that will be executed on a node:.
$ srun + command
Example:
$ srun hostname
will launch the command hostname on the node choose by Slurm..
Use sbatch to launch a script:
Lthe batch mode allows to launch a analysis in several setps defined in a script.
Slurm allows to use several scripts languages
such as bash, perl or python.
Slurm allocates the desired resources and launches the analyses in background.
To be interpreted by Slurm, a script must contain a header with the Slurm options beginning by the keyword #BATCH.
Slurm example script:
#!/bin/bash
## Define the job name
#SBATCH --job-name=test
## Define the output file
#SBATCH --output=res.txt
## Define the number of tasks
#SBATCH --ntasks=1
## Define the execution limit
#SBATCH --time=10:00
## Define 100Mb of memory per cpu
#SBATCH --mem-per-cpu=100
sleep 180 #lance une pause de 180s
to launch a analysis via a script:
$ sbatch script.sh
Withscript.sh the script to use
More Slurm options here: Slurm options
Example of script :
How to: Choose a particular partition
Depending on the type of jobs (analyses) you want to run, you can choose between different partitions.
Partitions are analysis queues with specific priorities and constraints such as the size or time limit of a job, the users authorized to use it, etc...
Jobs are prioritized and processed using the resources (CPU and RAM) of the nodes making up these partitions.
partition
role
nodes list
Number of cores
Ram
short
short jobs < 1 day (high priority,interactive jobs)
node13,node14,node15,node16,node18,node27
12 to 24 cores
48 to 144 Gb
normal
jobs < 7 days
node0,node1,node3,node4,node5,node7, node9,node13,node17,node20,node21,node22,node23,node24, node27,node30
20 to 112 cores
64 to 512Gb
long
<7 dayss< long jobs< 45 days
node8,node10,node12
12 to 24 cores
48 to 64 Gb
highmem
jobs with memory needs
node25,node28,node29
40 to 112 cores
512Gb to 1 Tb
global
partition for the GLOBAL project
node31
112 cores
512 Gb
supermem
jobs with important memory needs
node2
256 coeurs
2 Tb
gpu
analyses on GPU cores
node26
24 cpus and 8 GPUS cores
192 Gb
The access to the gpu partition is restricted . A request can be made here: : request access to gpu
The partition can be chosen following this scheme:
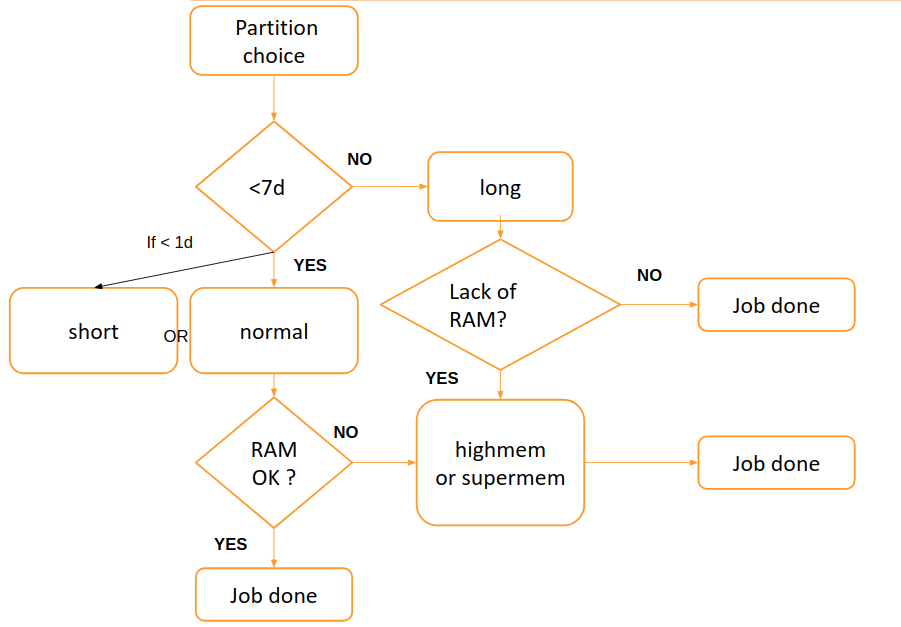
By default, the chosen partition is the normal partition.
Warning, highmem and highmemplus should only be used for jobs requiring at least 35-40GB of memory..
The supermem partition should be used for large assemblies and jobs requiring more than 100GB of memory.
You can use the htop on a node to visualize the memory consumed by a process.
To choose a partition, use the -p option.
sbatch -p partition
srun -p partition
With partition the chosen partition.
How to : View and delete your data contained in the /scratch partition of the nodes
the 2 scripts are located here/opt/scripts/scratch-scripts/
To see your data contained in the /scratch of the nodes:
sh /opt/scripts/scratch-scripts/scratch_use.sh
and follow the instructions
To delete your data contained in the /scratch partition of the nodes: launch the following command:
sh /opt/scripts/scratch-scripts/clean_scratch.sh
and follow the instructions
How to : Use a singularity container
Singularity is installed on the Itrop Cluster with several versions
Containers are located in /usr/local/bioinfo/containers
You first need to load the environment with the command:
module load singularity or module load singularity/version_wanted
Get help:
Use the command:
singularity help /usr/local/bioinfo/containers/singularity_version/container.simg
with container.simg the container name .
Shell connection to a container:
singularity shell /usr/local/bioinfo/containers/singularity_version/container.simg
Launch a container with only one application:
singularity run /usr/local/bioinfo/containers/singularity_version/container.simg + arguments
Launch a container with several applications:
singularity exec /usr/local/bioinfo/containers/singularity_version/container.simg + tools + arguments
Bind a host folder to a singularity container.
Use the option --bind /host_partition:/container_partition
Example:
singularity exec --bind /toto2:/tmp /usr/local/bioinfo/containers/singularity_version/container.simg + tools + arguments
The container will have access to the file of the partition /toto2 of the host in its /tmp partition
By default, partitions /home, /opt,/scratch, /projects/medium, projects/large/projects/xl, /users and /share are already binded.
How to : Cite the Itrop platform in your publications
Please just copy the following sentence:
“The authors acknowledge the ISO 9001 certified IRD i-Trop HPC (South Green Platform) at IRD montpellier for providing HPC resources that have contributed to the research results reported within this paper.
URL: https://bioinfo.ird.fr/- http://www.southgreen.fr
”
Links
- Related courses : Linux for Dummies
- Related courses : HPC
- Tutorials : Linux Command-Line Cheat Sheet
License
The resource material is licensed under the Creative Commons Attribution 4.0 International License (here).
 i1148s