HPC Practice SLURM
| Description | Hands On Lab Exercises for HPC |
|---|---|
| Related-course materials | HPC |
| Authors | Ndomassi TANDO (ndomassi.tando@ird.fr) |
| Creation Date | 25/11/2019 |
| Last Modified Date | 20/05/2025 |
Summary
- Preambule: Softwares to install before connecting to a distant linux server
- Practice 1: Get connecting on a linux server by
ssh - Practice 2: Reserve one core of a node using qrsh and create your working folder
- Practice 3: Transfering files with filezilla
sftpand install your ssh keys - Practice 4: Transfering data to the node
scp - Practice 5: Use module environment to load your tool
- Practice 6: Launch analyses
- Practice 7: Transfering data to the san server
scp - Practice 8: Deleting your temporary folder
- Practice 9: Launch a job via sbatch
- Links
- License
Preambule
Getting connected to a Linux servers from Windows with SSH (Secure Shell) protocol
| Platform | Software | Description | url |
|---|---|---|---|
 |
mobaXterm | an enhanced terminal for Windows with an X11 server and a tabbed SSH client | more |
 |
putty | Putty allows to connect to a Linux server from a Windows workstation. | Download |
Transferring and copying files from your computer to a Linux servers with SFTP (SSH File Transfer Protocol) protocol
| Platform | Software | Description | url |
|---|---|---|---|
   |
 filezilla filezilla |
FTP and SFTP client | Download |
Viewing and editing files on your computer before transferring on the linux server or directly on the distant server
| Type | Software | url |
|---|---|---|
| Distant, consol mode | nano | Tutorial |
| Distant, consol mode | vi | Tutorial |
| Distant, graphic mode | komodo edit | Download |
| Linux & windows based editor | Notepad++ | Download |
Install your ssh keys on your computer
Follow the instructions here according to your OS:
https://bioinfo.ird.fr/index.php/en/tutorials-howtos-add-ssh-keys/
Practice 1: Get Connecting on a linux server by ssh
In mobaXterm:
- Click the session button, then click SSH.
- In the remote host text box, type: bioinfo-master1.ird.fr
- Check the specify username box and enter your user name
- In the console, enter the password when prompted.
Once you are successfully logged in, you will be use this console for the rest of the lecture. - Type the command
sinfoand comment the result - type the command
sinfo -N nodes --longand noticed what have been added - Type the command
scontrol show nodes
Practice 2: Reserve one core of a node using srun and create your working folder
- Type the command
squeueand noticed the result - Type the command
squeue -u your_loginwith your_login to change with your account and noticed the difference - More details with the command:
squeue -O "username,name:40,partition,nodelist,NumCPUs,state,timeused,timelimit" - Type the command
srun -p short --pty bash -ithensqueueagain - Create your own working folder in the /scratch of your node:
cd /scratch
 mkdir login
 with login : the name of your choice
Practice 3 : Transferring files with filezilla sftp and install your ssh keys
Download and install FileZilla
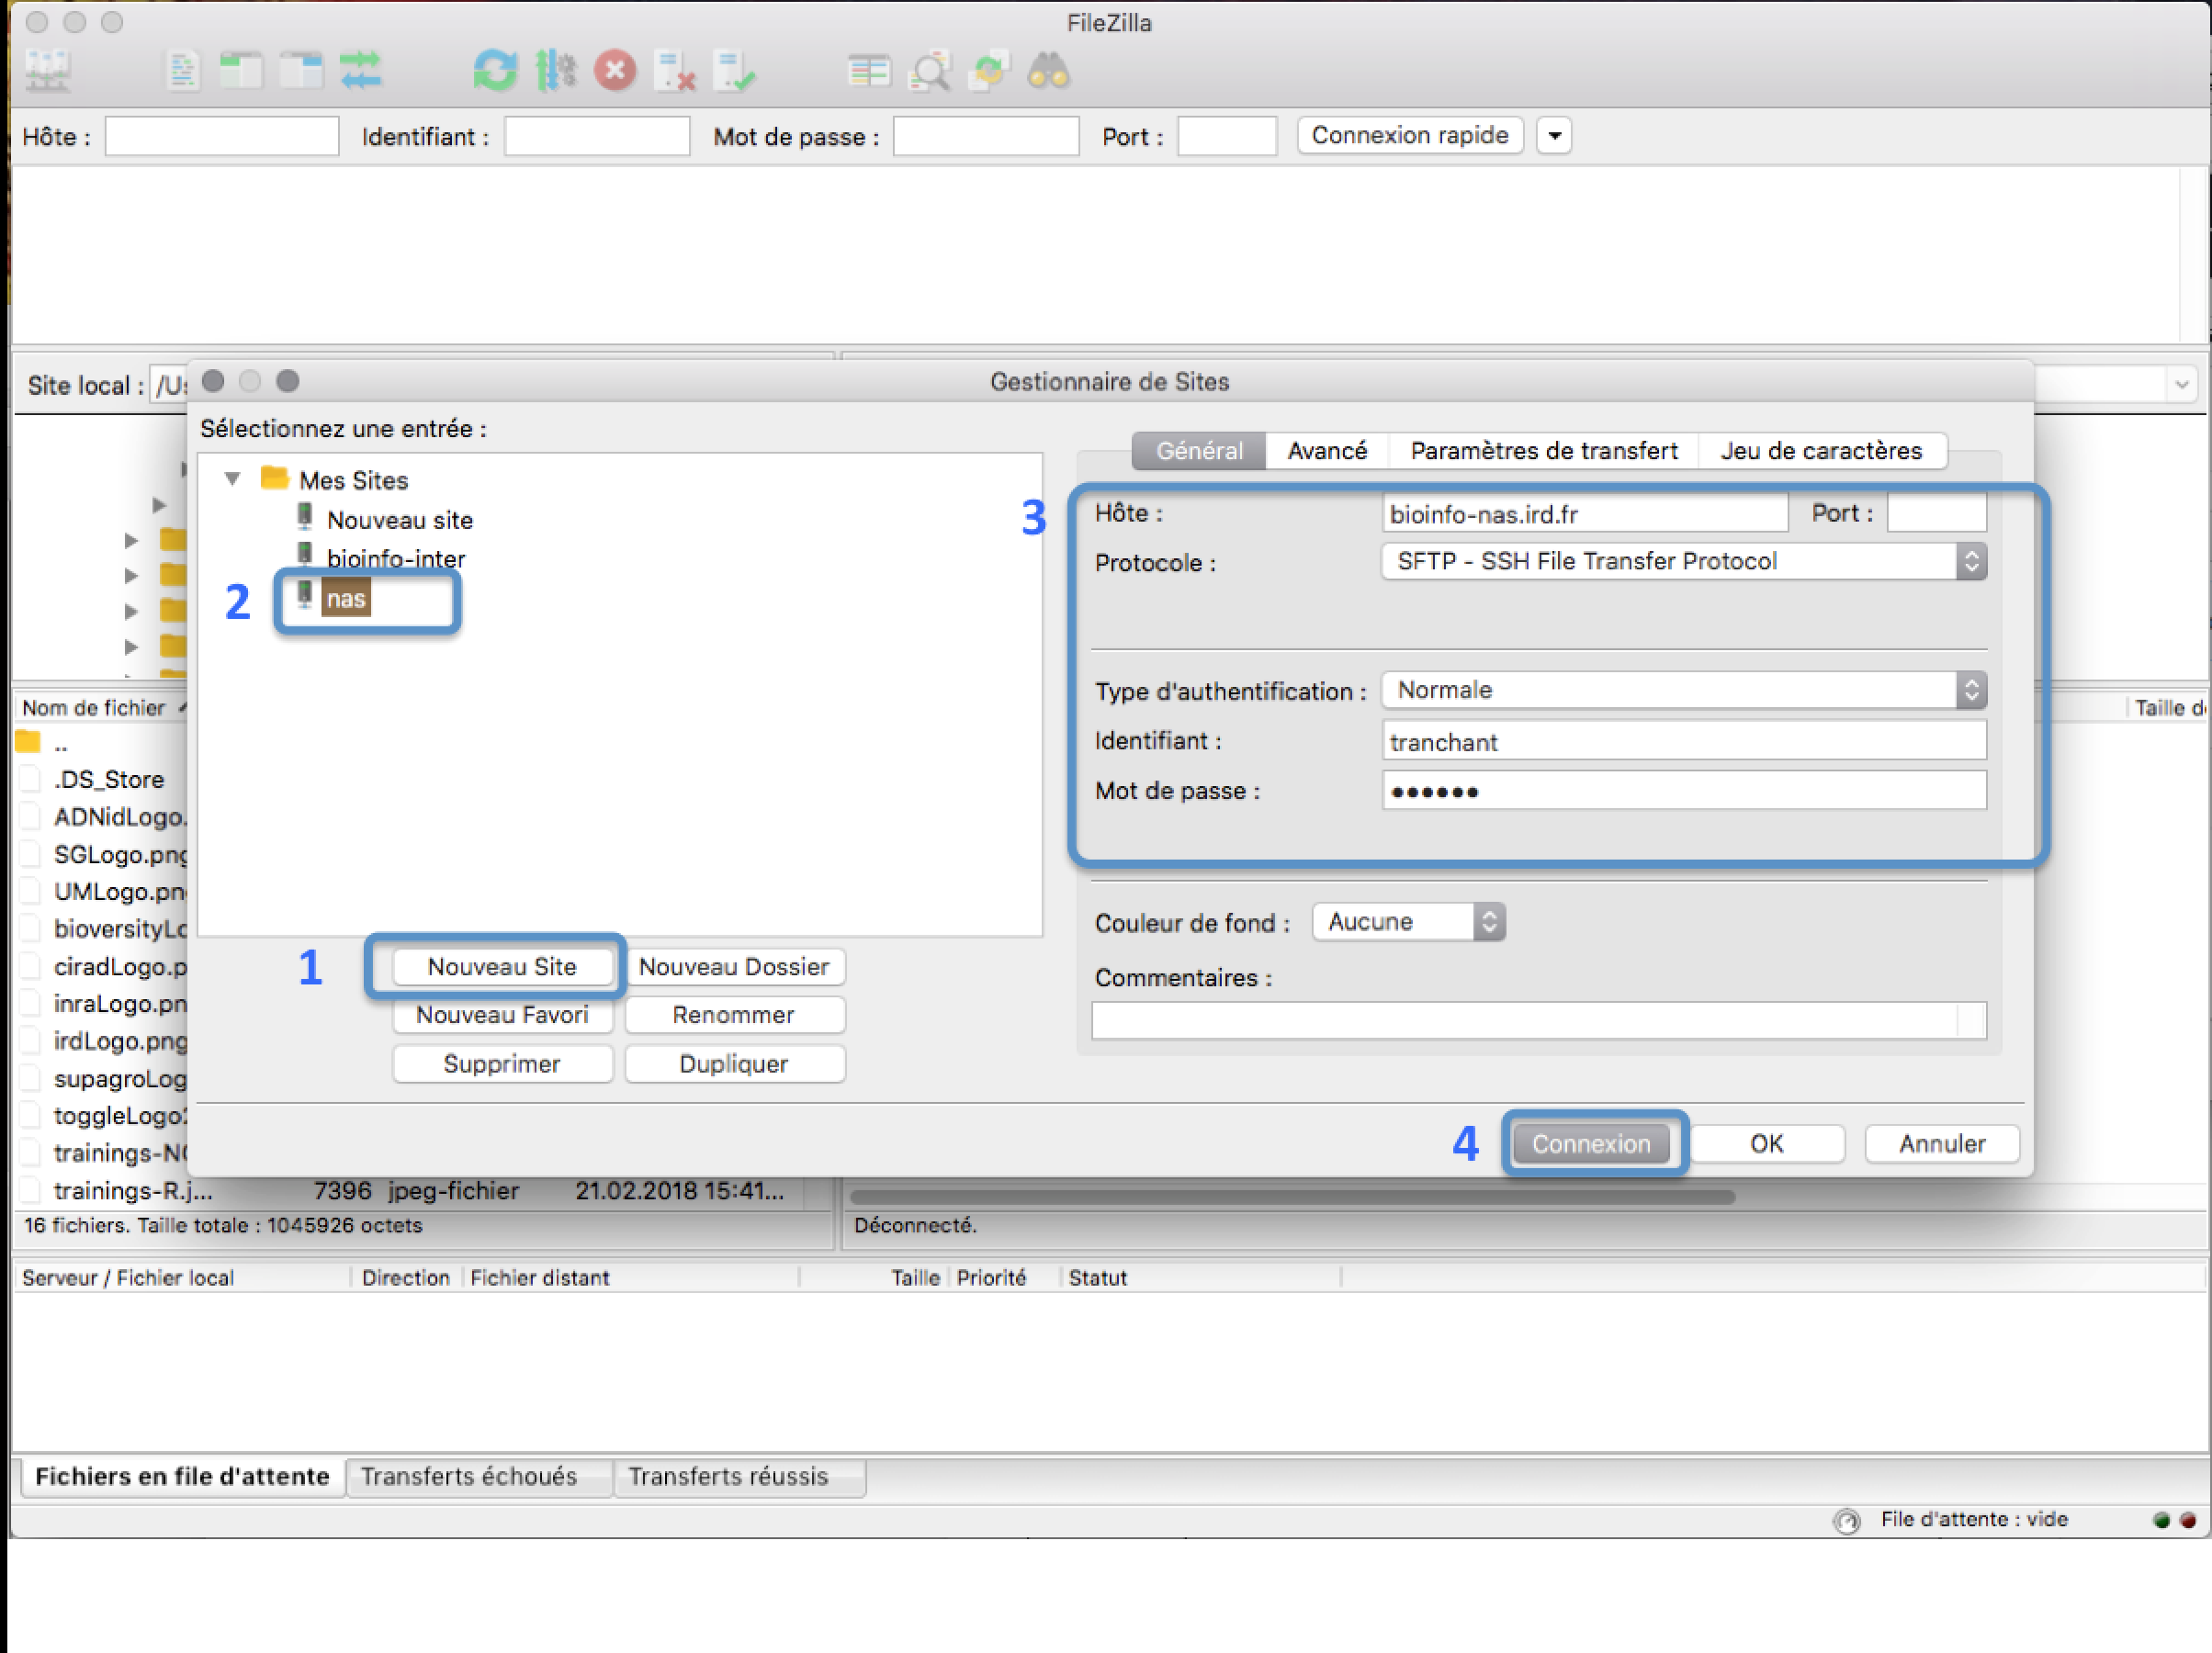
Open FileZilla and save the IRD cluster into the site manager

In the FileZilla menu, go to File > Site Manager. Then go through these 5 steps:
- Click New Site.
- Add a custom name for this site.
- Add the hostname bioinfo-san.ird.fr to have access to /home
- Set the Logon Type to "Normal" and insert your username and password used to connect on the IRD cluster
- Press the "Connect" button.
Transferring files

- From your computer to the cluster : click and drag an text file item from the left local colum to the right remote column
- From the cluster to your computer : click and drag an text file item from he right remote column to the left local column
- Retrieve the file ssh-login.zip from the right window into your folder /home/login
Practice 4: Transfer your data from the san server to the node
- Using scp, transfer the folder
Ebolalocated in/share/formation/Slurm/TPassemblyinto your working directory - Check your result with ls
Practice 5: Use module environment to load your tools
- Load abyss 2.2.5 module
- Check if the tool are loaded
Practice 6 : Launch analyses
Perform an assembly with abyss-pe
With abyss software, we reassembly the sequences using the 2 fastq.gz files ebola_R1.fastq.gz and ebola_R2.fastq.gz
Launch the command
abyss-pe k=35 in='ebola_R1.fastq.gz ebola_R2.fastq.gz' name=k35NB: you can do the same thing using srun directly from the master assuming that the data have been transfer to the /scratch of your node and that you know the nodename:
From the master, type the following commands:
module load abyss/2.2.5
srun -p partitionname --nodelist=nodename --chdir=/scratch/login/TPassembly/Ebola abyss-pe k=35 -j1 np=1  in='ebola1.fastq ebola2.fastq' name=k35
the -p allows to indicate the partition to use , replace partitionnameparameter
the --nodelist allows to indicate the node to use , replace nodenameparameter
the --chdir allows to change the working directory and to precise in which directory the analysis will be done directly into the node.
Practice 7: Transfering data to the san server
- Using scp, transfer your results from your
/scratch/loginto your/home/login - Check if the transfer is OK with ls
Practice 8: Deleting your temporary folder
cd /scratch
rm -r loginexitPractice 9: Launch a job with sbatch
Following the several steps performed during the practice, create a script to launch the analyses made in practice6:
1er step: create the Slurm section in your script
1) Set a name for your job
2) Precise your email
3) Choose the short partition
2nd step: type the commands you want the script to launch:
1) create a personal folder in /scratch with mkdir
2) Using scp, transfer the folder Ebola located in /share/formation/Slurm/TPassembly into your working directory
3) Launch abyss version 2.2.5 with module load
4) Into the the folder Ebola, launch the following command:
abyss-pe k=35 in='ebola1.fastq ebola2.fastq' name=k355) Using scp, transfer your results from your /scratch/login to your /home/login
6) Delete the personal folder in the /scratch
Launch the following commands to obtain info on the finished job:
seff <JOB_ID>
sacct --format=JobID,elapsed,ncpus,ntasks,state,node -j <JOB_ID>
Bonus:
We are going to launch a 4 steps analysis:
1) Perform a multiple alignment with the nucmer tool
2) Filter these alignments with the delta-filter tool
3) Generate a tab file easy to parse the with show-coords tools
4) Generate a png image with mummerplot
-
Retrieve the script /projects/medium/formation/Slurm/scripts/alignment_slurm.sh into your /home/login
-
modify the Slurm section and the variables
-
launch the script with sbatch:
sbatch alignment.sh-
Do a
ls -altrin your/home/login. What do you notice? -
Launch the following commands to obtain info on the finished job:
seff <JOB_ID>
sacct --format=JobID,elapsed,ncpus,ntasks,state,node -j <JOB_ID>-
Open filezilla and retrieve the png image to your computer
-
Launch the following commande to clear the /scratch of the node
sh /opt/scripts/scratch-scripts/scratch_use.shand choose the number of the node used
Links
- Related courses : Linux for Dummies
- Tutorials : Linux Command-Line Cheat Sheet
License


